
Introduction
Order blocks are one of the most popular ideas in Smart Money Concepts (SMC). Traders use them to find zones where large participants may have placed orders, and where price might react when it returns. Draw an order block correctly and you may get a precise entry with a tight stop. Draw it wrongly and you will see price slice straight through your zone.
The problem is that almost any candle can be labelled an order block after the fact. That is why understanding what makes an order block valid is far more important than simply knowing the definition. Good order block trading depends on context, confirmation and discipline.
This guide explains:
- What an order block is and why it may work
- Bullish and bearish order blocks
- The rules for identifying valid order blocks
- How to enter, place stops and set targets
- Related concepts such as breaker blocks and fair value gaps
- A worked example and common mistakes
What Is an Order Block in Order Block Trading?
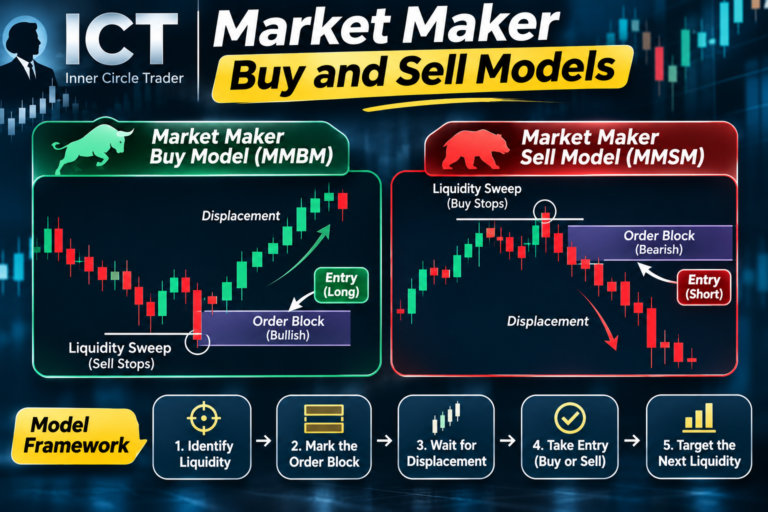
An order block is a price zone, usually marked by the last opposite-coloured candle (or small group of candles) before a strong, impulsive move that breaks market structure.
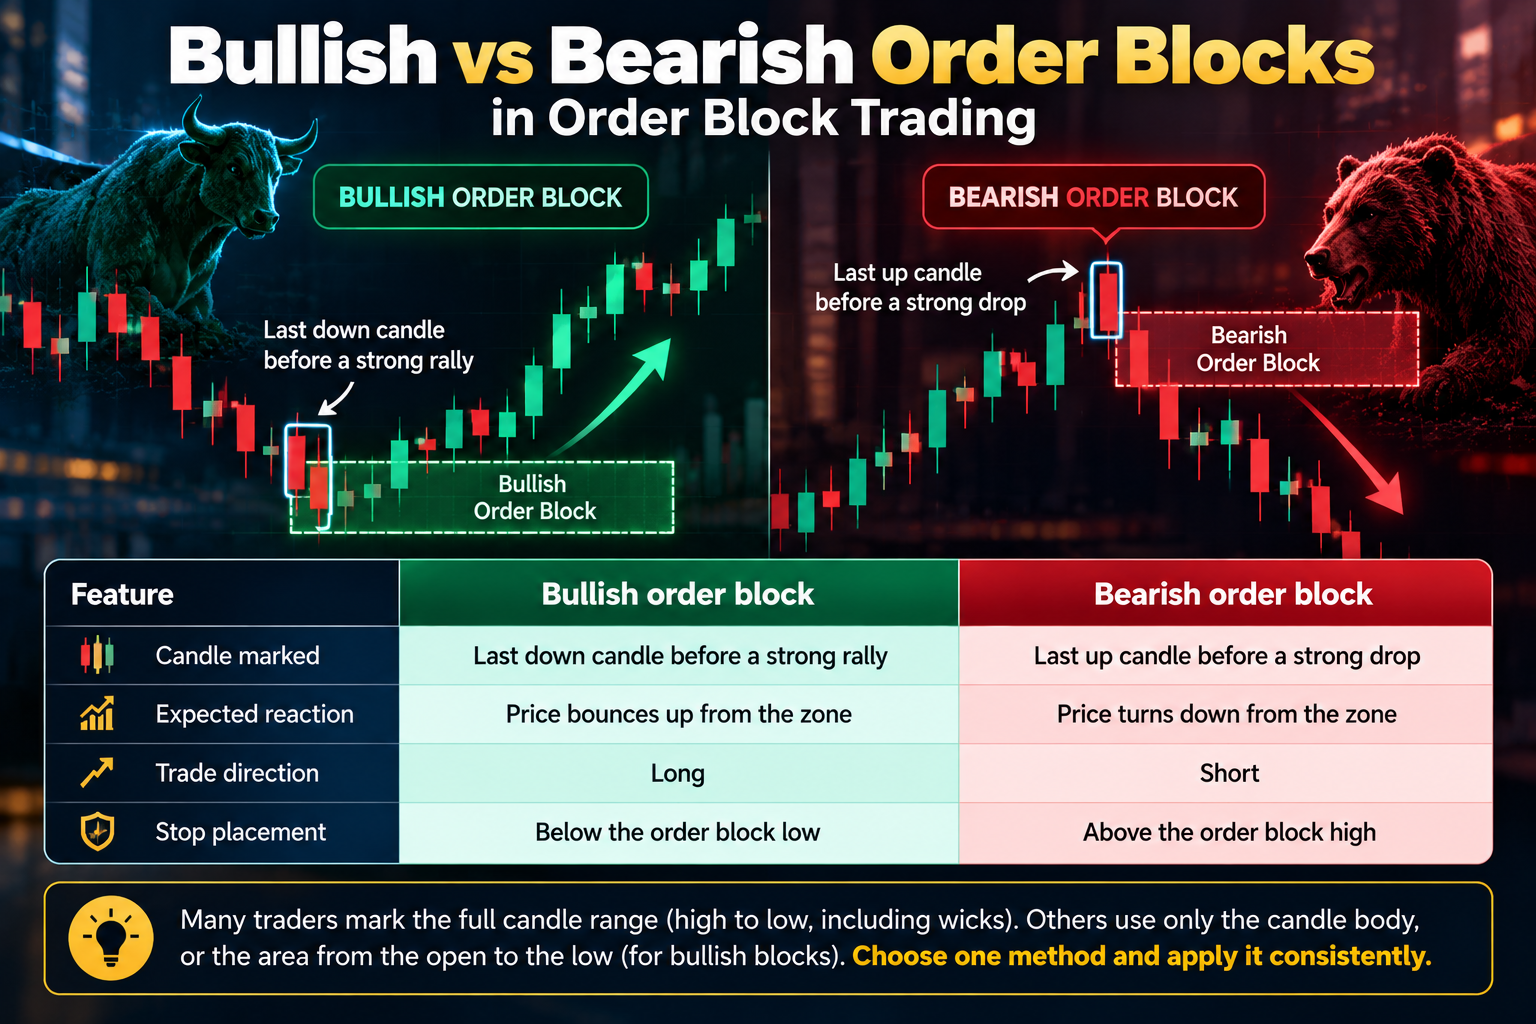
- Bullish order block: The last down candle before a strong move up.
- Bearish order block: The last up candle before a strong move down.
The idea is that large institutions cannot fill big orders all at once without moving price too much. They may build positions in a zone, and when price later returns to that zone, any remaining orders could cause a reaction. Order block trading aims to enter at these zones in the direction of the original move.
It is important to treat this as a framework rather than proof of institutional activity. Order blocks are a way of organising price action, and they work best when combined with other confirmation.
Why Order Block Trading Can Work
Order blocks often line up with areas of genuine supply and demand. When price leaves a zone very quickly, it suggests an imbalance between buyers and sellers. Later, when price returns:
- Traders who missed the original move may enter.
- Traders who were trapped on the wrong side may exit at break-even, adding to the move.
- Any unfilled orders from the original move may be triggered.
These effects can create a reaction from the zone. But not every zone holds, which is why filtering for validity is essential.
Bullish vs Bearish Order Blocks in Order Block Trading
| Feature | Bullish order block | Bearish order block |
|---|---|---|
| Candle marked | Last down candle before a strong rally | Last up candle before a strong drop |
| Expected reaction | Price bounces up from the zone | Price turns down from the zone |
| Trade direction | Long | Short |
| Stop placement | Below the order block low | Above the order block high |
Many traders mark the full candle range (high to low, including wicks). Others use only the candle body, or the area from the open to the low (for bullish blocks). Choose one method and apply it consistently.
Order Block Trading: The Rules of a Valid Order Block
This is the heart of order block trading. A candle before a move is not automatically a valid order block. Look for the following features.
1. Strong displacement
The move away from the order block should be sharp and impulsive, with large candles and little overlap. Weak, choppy moves suggest there was no real imbalance.
2. Break of structure
A valid order block usually leads to a break of market structure. For a bullish order block, the move should break a previous swing high. For a bearish order block, it should break a previous swing low. Without a structural break, the zone has less significance.
3. Fair value gap (imbalance)
Strong moves often leave a fair value gap: a three-candle pattern where the wicks of the first and third candles do not overlap. An order block followed by a fair value gap shows strong one-sided pressure.
4. Liquidity sweep
Many high-quality order blocks form after price sweeps liquidity, such as taking out a previous low before rallying. This suggests stop orders were triggered and absorbed before the real move began.
5. Unmitigated zone
An order block is strongest the first time price returns to it. Once price has already traded back into the zone and reacted, it is considered mitigated, and later retests are usually weaker.
6. Alignment with higher-timeframe bias
A bullish order block in a higher-timeframe uptrend is generally more reliable than one against the trend. Always check the bigger picture.
7. Premium and discount
In SMC, a range is often split in half. Buying in the lower half (discount) and selling in the upper half (premium) improves the odds. A bullish order block in discount is generally more attractive than one in premium.
| Check | Valid order block | Weak or invalid order block |
|---|---|---|
| Move away | Strong displacement | Slow, overlapping candles |
| Structure | Breaks a swing point | No structural break |
| Imbalance | Fair value gap present | No gap |
| Liquidity | Swept before the move | No liquidity taken |
| Status | Unmitigated | Already tested |
| Bias | With higher-timeframe trend | Against the trend |
Order Block Trading Step by Step
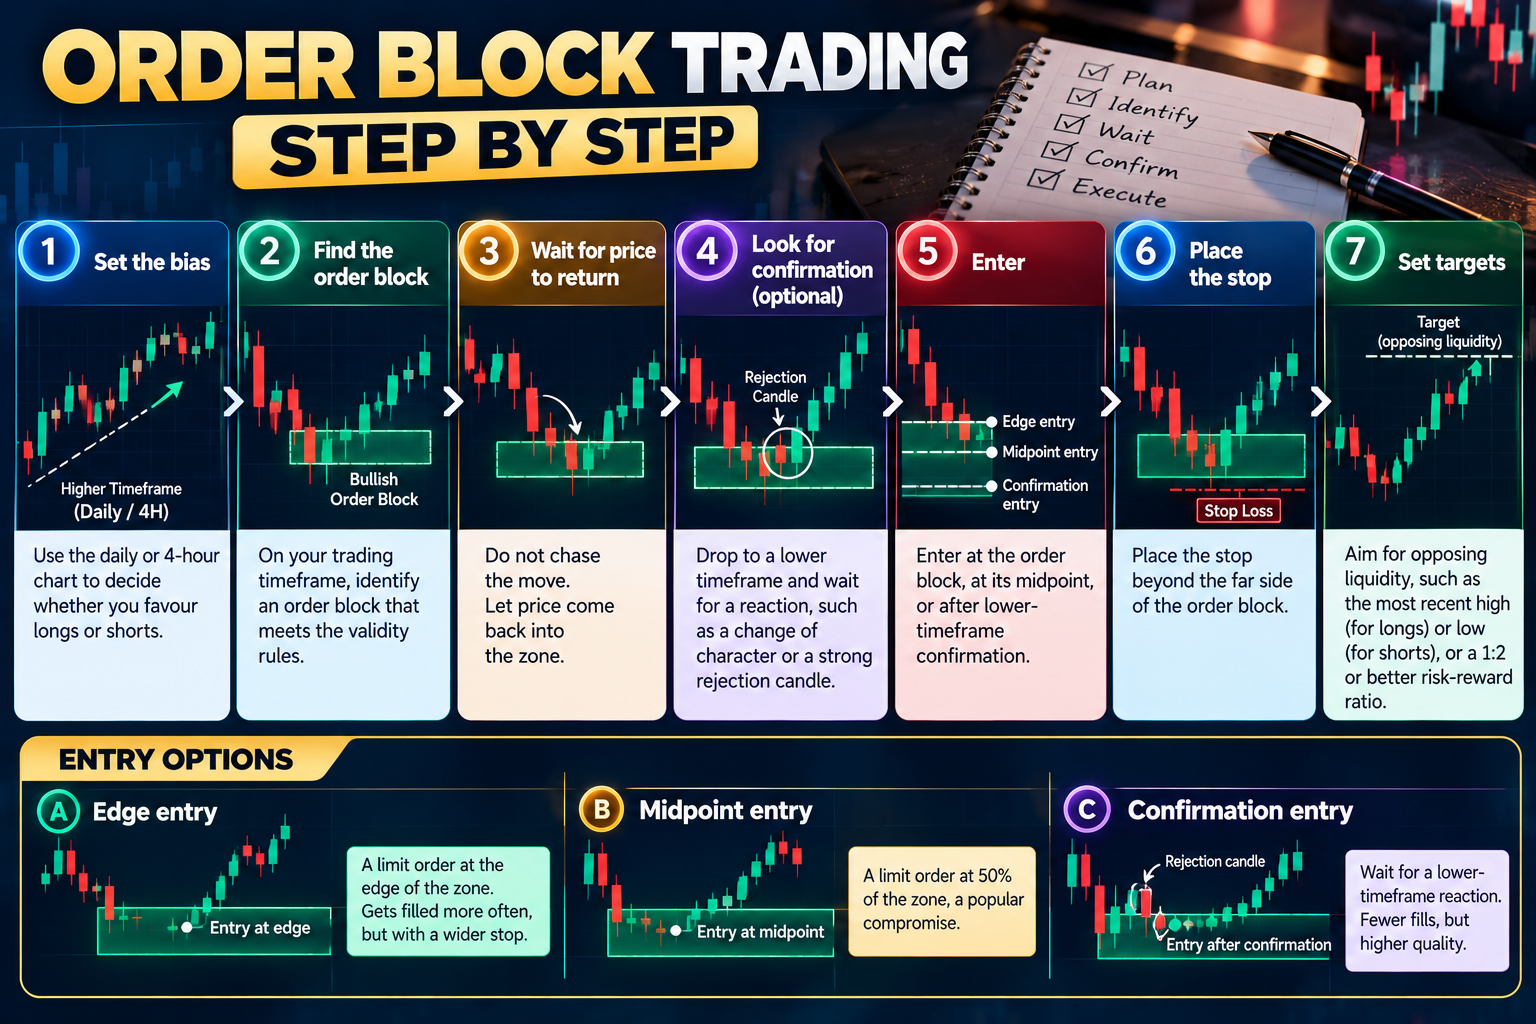
- Set the bias: Use the daily or 4-hour chart to decide whether you favour longs or shorts.
- Find the order block: On your trading timeframe, identify an order block that meets the validity rules above.
- Wait for price to return: Do not chase the move. Let price come back into the zone.
- Look for confirmation (optional): Drop to a lower timeframe and wait for a reaction, such as a change of character or a strong rejection candle.
- Enter: Enter at the order block, at its midpoint, or after lower-timeframe confirmation.
- Place the stop: Beyond the far side of the order block.
- Set targets: Aim for opposing liquidity, such as the most recent high (for longs) or low (for shorts), or a 1:2 or better risk-reward ratio.
Entry options
- Edge entry: A limit order at the edge of the zone. Gets filled more often, but with a wider stop.
- Midpoint entry: A limit order at 50% of the zone, a popular compromise.
- Confirmation entry: Wait for a lower-timeframe reaction. Fewer fills, but higher quality.
Order Block Trading: Worked Example
Imagine EUR/USD is in an uptrend on the 4-hour chart. On the 1-hour chart:
- Price dips below a previous low at 1.1600, sweeping sell-side liquidity, and prints a down candle with a range of 1.1585 to 1.1605.
- Price then rallies sharply, breaks above a swing high at 1.1650 and leaves a fair value gap. The last down candle (1.1585 to 1.1605) is marked as the bullish order block.
- A day later, price pulls back into the zone for the first time.
- On the 5-minute chart, price forms a bullish change of character inside the zone.
- The trader buys at 1.1600, with a stop at 1.1580, below the order block.
- The target is the recent high at 1.1680.
The trade risks 20 pips to make 80, a risk-reward ratio of 1:4. This setup ticks most of the validity boxes: liquidity sweep, displacement, break of structure, fair value gap, unmitigated zone and alignment with the higher-timeframe trend.
This example is illustrative and uses hypothetical prices.
Related Concepts in Order Block Trading
Breaker blocks
A breaker block is a failed order block. If price breaks through a bullish order block with strength, that zone may later act as resistance. Some traders use breakers as reversal zones.
Mitigation blocks
A mitigation block forms when price fails to make a new high or low and then breaks structure in the opposite direction. The zone is where trapped traders may look to exit at break-even.
Fair value gaps
Fair value gaps often appear next to order blocks. Some traders use the gap as their entry zone, while others combine the gap and order block into a single area of interest.
Supply and demand zones
Order blocks are closely related to classic supply and demand zones. The main difference is that SMC places greater emphasis on structure breaks, liquidity and displacement.
Choosing Timeframes for Order Block Trading
- Higher timeframes (daily, 4-hour): Identify major order blocks and overall bias.
- Intermediate timeframes (1-hour, 15-minute): Find tradable order blocks within that bias.
- Lower timeframes (5-minute, 1-minute): Refine entries with confirmation.
Higher-timeframe order blocks tend to be more significant, but they also require wider stops. Many traders combine a higher-timeframe zone with a lower-timeframe entry for better risk-reward. This multi-timeframe approach is central to modern order block trading, because it pairs the strength of a major zone with the precision of a small one.
Common Order Block Trading Mistakes
- Marking every candle as an order block: Without displacement and structure breaks, most zones are noise.
- Trading mitigated zones: Zones that have already been tested are less reliable.
- Ignoring higher-timeframe bias: Counter-trend order blocks fail more often.
- Placing stops too tight: Stops just inside the zone are easily hit.
- Chasing price: Entering after price has already left the zone worsens risk-reward.
- Using inconsistent rules: Switching between wick and body methods creates confusion.
- Ignoring news: Major releases can blow through any zone.
Order Block Trading Checklist
- Is the higher-timeframe bias clear?
- Was there strong displacement away from the zone?
- Did the move break market structure?
- Is there a fair value gap?
- Was liquidity swept before the move?
- Is the zone unmitigated?
- Is it in discount (for longs) or premium (for shorts)?
- Is the risk-reward at least 1:2?
The more boxes you can tick, the higher the quality of the setup. Many disciplined traders only take order block trading setups that meet most of these conditions.

Risk Management in Order Block Trading
- Risk a fixed percentage: Many traders risk 0.5–1% per trade.
- Expect some zones to fail: No order block works every time.
- Avoid stacking correlated trades: Multiple order block trades on correlated pairs multiply risk.
- Journal every trade: Note which validity criteria were present and review the results.
Order Block Trading in Indian Markets
The concepts can be applied to any liquid market, including NSE currency futures such as USD/INR, Nifty and Bank Nifty futures, and MCX commodities. In narrow-range markets like USD/INR, focus on higher timeframes, where zones are clearer.
Indian residents should trade currencies only through recognised exchanges such as NSE and BSE, via SEBI-registered brokers. Leveraged forex trading through offshore CFD platforms is not permitted under FEMA.
FAQs
What is an order block?
It is a price zone, usually the last opposite candle before a strong move that breaks structure, where large orders may have been placed.
How do I know if an order block is valid?
Look for strong displacement, a break of structure, a fair value gap, a prior liquidity sweep, an unmitigated zone and alignment with the higher-timeframe bias.
Should I use the wick or body of the candle?
Both methods are used. Choose one and apply it consistently.
What timeframe is best for order block trading?
Many traders identify zones on the 4-hour or 1-hour chart and refine entries on the 5- or 15-minute chart.
Do order blocks always work?
No. They are probability-based zones, so risk management and confirmation are essential. Even the best order block trading setups fail regularly; the goal is for winners to outweigh losers over many trades.
Conclusion
Order block trading can offer precise entries and excellent risk-reward, but only if you focus on valid zones. A true order block is more than the last opposite candle; it is backed by displacement, a structure break, often a fair value gap and a liquidity sweep, and it sits in line with the bigger trend.
Use clear rules, wait for price to return to fresh zones, confirm when possible and manage risk carefully. Practise marking order blocks on historical charts and a demo account until you can separate high-quality zones from noise.