

Quick answer
A mitigation block is a reversal zone in SMC/ICT that forms from a failure swing – price fails to sweep a prior high or low, then breaks structure. In mitigation block trading, the one thing separating it from a breaker block is the liquidity sweep: a breaker sweeps liquidity first; a mitigation block does not.
Introduction
Order block, breaker block, mitigation block – to a newcomer they blur into a wall of jargon and rectangles. But there’s a clean logic underneath, and mitigation block trading in particular hinges on a single, learnable distinction. Get that distinction and a lot of Smart Money Concepts falls into place; miss it, and you’ll keep confusing two zones that behave quite differently.
This guide explains what a mitigation block is, why it’s named that way, exactly how it differs from a breaker block, and how to trade it – plus an honest note on the terminology confusion that trips up even intermediate traders. This is educational content, not investment advice, and SMC is a discretionary framework with no guarantees.
What Is a Mitigation Block?
A mitigation block is a reversal zone that forms when the market fails to continue its trend – a ‘failure swing’ – and then breaks structure in the opposite direction. In an uptrend, for example, price makes a lower high (it fails to push to a new high), then breaks below the prior swing low, shifting structure down. The origin of that failed push – the last cluster of candles before the reversal – becomes the mitigation block, a zone price often returns to before the new move continues.
The defining feature is what did NOT happen: no liquidity was swept. Price failed to take out the previous high or low before reversing. That single fact is what makes it a mitigation block rather than a breaker block.
Why Is It Called ‘Mitigation’?
The name comes from the institutional story SMC tells. When a move fails, some large orders are left offside – positions that didn’t work out. Price returning to the block gives those participants a chance to ‘mitigate’ – to offset, rebalance or exit those positions near their original entry – before committing to the new direction. So the mitigation block is the area price revisits to let that rebalancing happen. For the SMC trader, that revisit is the opportunity: a chance to enter alongside the institutions as they clean up and prepare for the next leg.
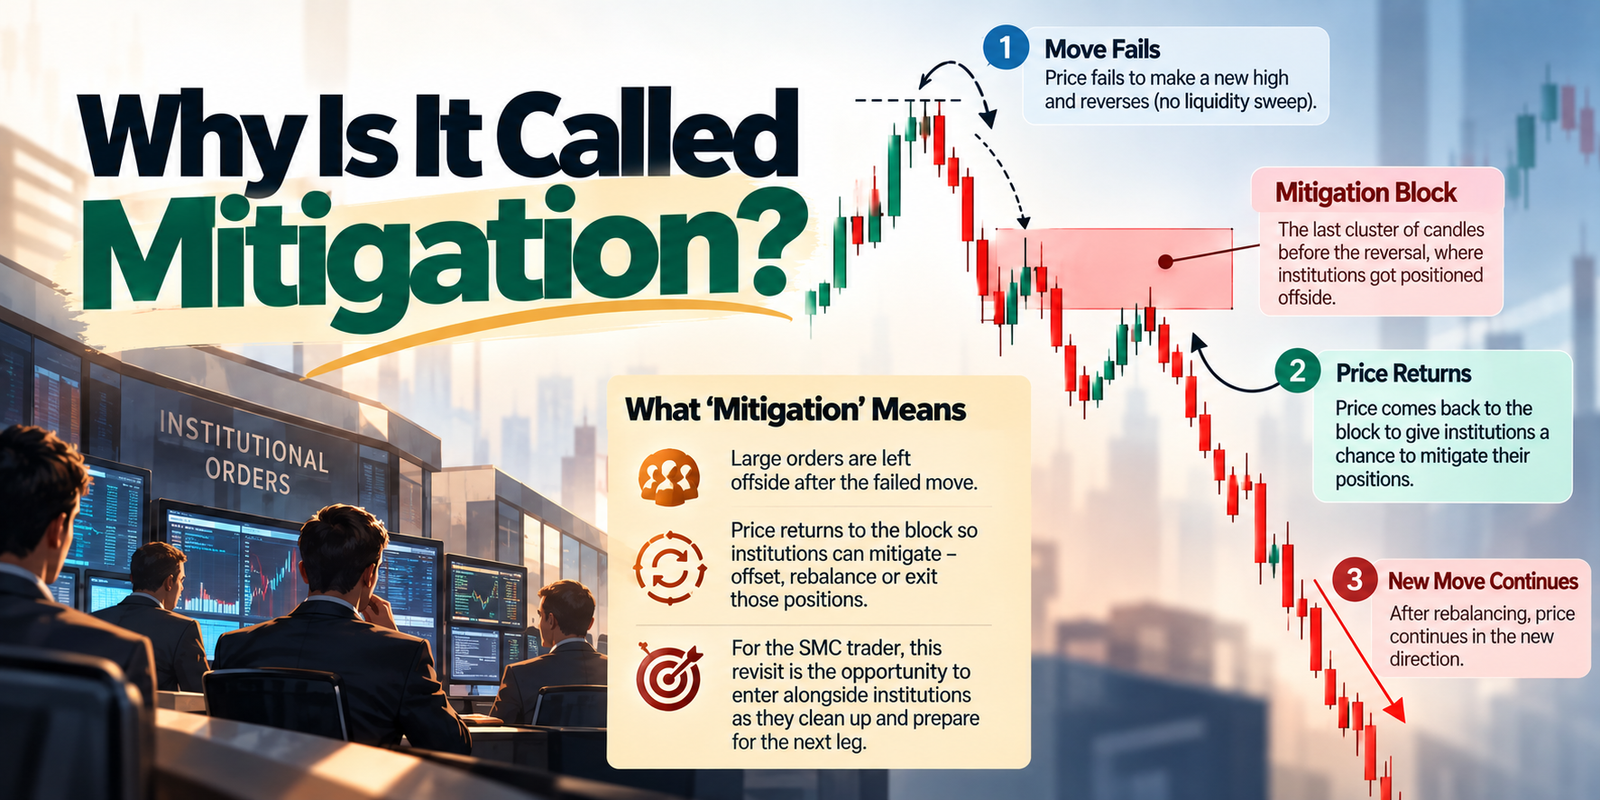
How a Mitigation Block Forms (Step by Step)
A bearish example makes the sequence clear:
- The market is trending up – making higher highs and higher lows.
- A failure swing appears – price makes a lower high, failing to reach a new high (no sweep of the prior high).
- Structure breaks – price breaks below the last higher low, shifting structure to the downside.
- The block is marked – the origin of that failed push becomes the mitigation block (a supply zone).
- Price returns and reacts – price rallies back into the block to mitigate positions, then continues down.
The bullish version mirrors this: a higher low that fails to sweep the prior low, a break of structure up, and a demand mitigation block below.
The Key Comparison: Order vs Breaker vs Mitigation
These three zones are constantly confused. Here’s the clean breakdown:
| Block | How it forms | Liquidity sweep? | Role |
|---|---|---|---|
| Order block | Last opposing candle before an impulsive move | N/A (it’s the origin) | Trend-continuation zone |
| Mitigation block | Failure swing (no new high/low), then break of structure | No sweep | Reversal zone, weaker conviction |
| Breaker block | Sweeps a high/low (successful swing), then break of structure | Yes, sweep first | Reversal zone, stronger conviction |
The one difference that matters
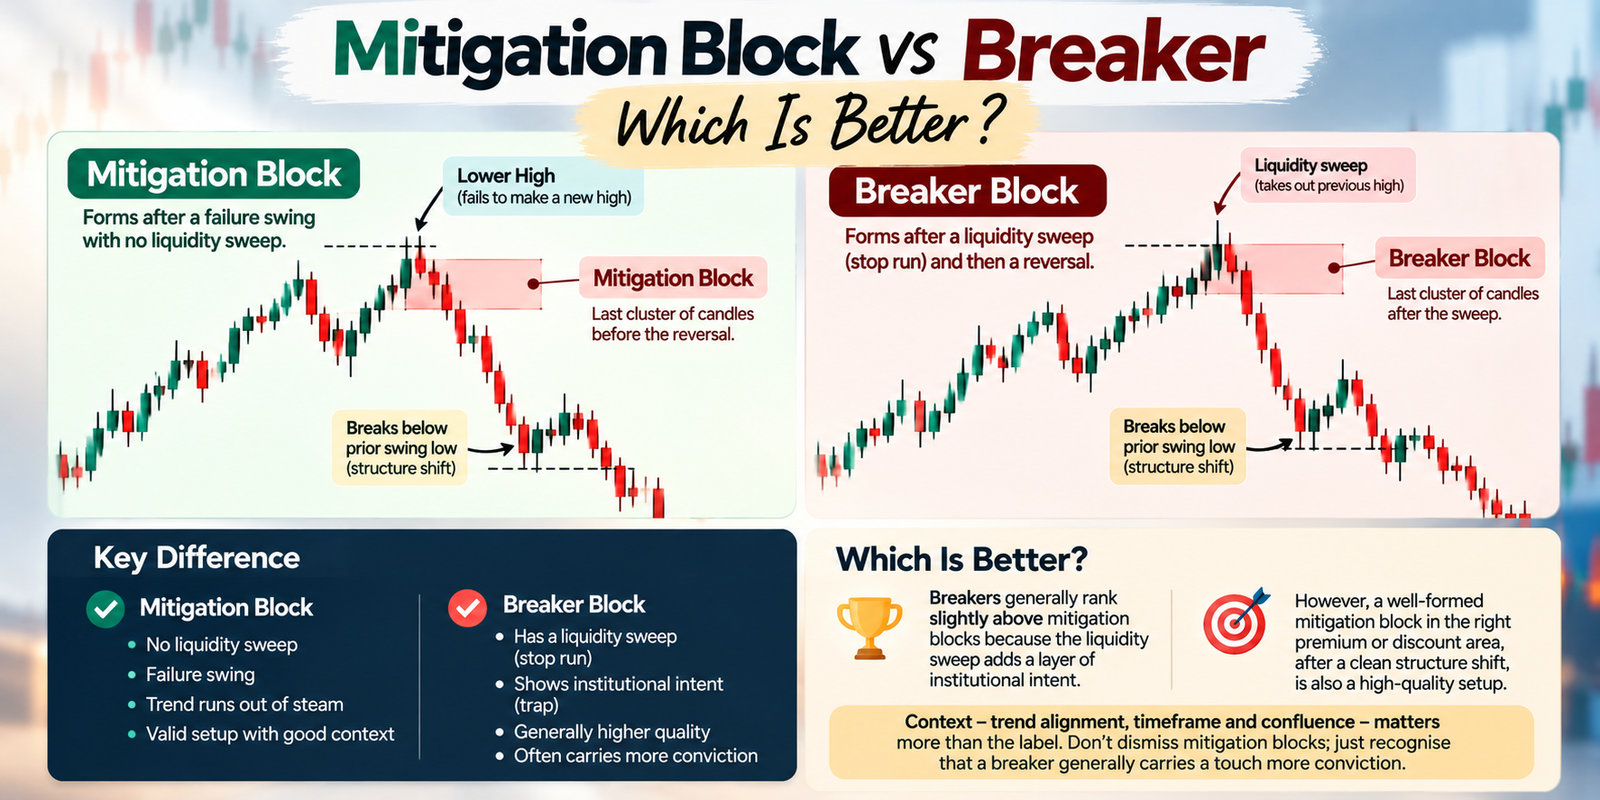
Breaker block: price SWEEPS liquidity (makes a higher high or lower low) before breaking structure. Mitigation block: price FAILS to sweep (makes a lower high or higher low) before breaking structure. Always check for the sweep first – its presence or absence is the whole dividing line
A Note on Terminology (Read This)
Honesty matters here: ‘mitigation block’ is not used identically across the trading world. The cleanest, most widely taught approach – and the one used above – follows ICT precisely: a breaker is a failed order block WITH a liquidity sweep, and a mitigation block is a failed order block WITHOUT one. But some SMC communities use ‘mitigation block’ more loosely for any zone where institutional orders are filled on a retracement, and a few even describe it as forming after a sweep. This cross-community inconsistency is a real source of confusion. The practical fix is simple: pick the ICT-precise definition, apply it consistently, and don’t assume every trader means the same thing by the term.
How to Identify a Mitigation Block on a Chart
- Read higher-timeframe structure – establish the trend and where momentum is weakening on H1, H4 or daily.
- Find the failure swing – a lower high (in an uptrend) or higher low (in a downtrend) that did NOT sweep the prior extreme.
- Confirm the structure break – price must break structure against the trend after the failure swing.
- Mark the origin – the last candles before the failed push become your mitigation block zone.
- Check there was no sweep – if liquidity WAS taken first, it’s a breaker, not a mitigation block.
How to Trade a Mitigation Block
- Wait for the return – let price retrace back into the mitigation block in the new direction.
- Look for confirmation – a reaction, rejection or a fair value gap inside the block strengthens the entry.
- Enter at the block – sell a bearish (supply) mitigation block, buy a bullish (demand) one.
- Stop beyond the block – place your stop just past the block’s far edge – if price closes through, it failed.
- Target the next liquidity – aim for the next structural level or liquidity pool, keeping sound risk-reward.
Mitigation Block vs Breaker: Which Is Better?
Generally, breakers rank slightly above mitigation blocks in quality – not because mitigation blocks are weak, but because the liquidity sweep behind a breaker adds a layer of institutional intent that a simple failure swing doesn’t. A stop run shows the algorithm deliberately engineered a trap; a failure swing shows the trend merely ran out of steam. That said, a well-formed mitigation block sitting in the right premium or discount area, after a clean structure shift, is a perfectly valid, high-quality setup. Context – trend alignment, timeframe, confluence – matters more than the label. Don’t dismiss mitigation blocks; just recognise that a breaker generally carries a touch more conviction.
Common Mistakes
- Calling a breaker a mitigation block (or vice versa) by ignoring the liquidity sweep.
- Marking a mitigation block without a genuine break of structure.
- Trading against the higher-timeframe trend on a low-timeframe block.
- Assuming every trader means the same thing by ‘mitigation block’.
- Skipping the stop-loss because the zone ‘should’ hold.
Myths vs Facts
| Myth | Fact |
|---|---|
| Mitigation and breaker blocks are the same. | They differ by one thing: the breaker sweeps liquidity, the mitigation block doesn’t. |
| A mitigation block needs a stop hunt. | No – it forms from a failure swing, without sweeping the prior extreme. |
| Mitigation blocks are useless vs breakers. | They’re valid setups; breakers just carry slightly more intent. |
| Everyone defines the term the same way. | Communities differ; use the ICT-precise definition consistently. |
Risk disclaimer
This article is for educational purposes only and is not investment advice. Mitigation blocks are a discretionary Smart Money Concepts/ICT idea, terminology varies between communities, and setups can fail. Trading involves risk of loss, and most retail traders lose money. Always use a stop-loss and sound position sizing, trade only through SEBI-registered brokers on recognised exchanges, and consult a qualified professional before trading.
Expert Analysis
The value in learning mitigation blocks properly is less about the zone itself and more about the discipline of distinguishing it from a breaker, because that single distinction – the liquidity sweep – forces you to read intent rather than shape. Two setups can look almost identical on the chart: a failed order block, a structure break, a retest. But one was preceded by a stop run and the other wasn’t, and that difference tells you a different institutional story. The breaker says the algorithm engineered a trap, grabbed liquidity, and reversed with purpose; the mitigation block says the trend simply exhausted and rolled over. Traders who skip this reading treat every rectangle the same and wonder why some ‘flip zones’ react violently while others limp. The habit of asking ‘was liquidity swept before this broke?’ is the real skill the concept teaches.
The honest complication – and it’s worth stating plainly because so much SMC content glosses over it – is that the term ‘mitigation block’ is genuinely inconsistent across the trading community. Some educators reserve it strictly for the failed-order-block-without-a-sweep case; others use it loosely for any retracement into a prior institutional zone; a few even flip the definition entirely. This isn’t a detail to memorise so much as a warning: when you read someone else’s analysis or copy someone else’s rules, confirm which definition they’re using before you trust the label. The pragmatic path is to adopt the precise ICT convention, apply it the same way every time, and treat mitigation blocks as one valid tool among several rather than a magic level. As always, the zone is a hypothesis, not a guarantee; the stop-loss, the position size and the higher-timeframe context are what actually protect the account, whatever you call the rectangle.
Key Takeaways
- A mitigation block is a reversal zone formed from a failure swing – no liquidity sweep before the structure break.
- It’s named for institutions returning to ‘mitigate’ (rebalance) offside positions.
- The one difference from a breaker block is the liquidity sweep: breaker sweeps, mitigation doesn’t.
- Trade it on the retest, with a stop beyond the block and a target at the next liquidity.
- Terminology varies across communities – adopt the ICT-precise definition and apply it consistently.
Frequently Asked Questions (FAQ)
Q: What is a mitigation block?
A: A reversal zone that forms from a failure swing – price fails to sweep a prior high or low, then breaks structure. The origin of the failed push becomes the block.
Q: Why is it called a mitigation block?
A: Because price returns to it so institutions can ‘mitigate’ – offset or rebalance – positions left offside, before continuing the new move.
Q: How is a mitigation block different from a breaker block?
A: The liquidity sweep. A breaker sweeps a high or low before breaking structure; a mitigation block breaks structure without sweeping.
Q: How does a mitigation block form?
A: A failure swing (a lower high in an uptrend or higher low in a downtrend) that doesn’t sweep the prior extreme, followed by a break of structure.
Q: Is a mitigation block bullish or bearish?
A: Either: a bearish (supply) mitigation block forms from a failed up-push; a bullish (demand) one forms from a failed down-push.
Q: How do I trade a mitigation block?
A: Wait for price to return into the block in the new direction, look for confirmation, enter, and place your stop beyond the block’s far edge.
Q: Is a mitigation block better than a breaker block?
A: Breakers generally carry slightly more intent due to the liquidity sweep, but a well-placed mitigation block is a valid, high-quality setup.
Q: What is a failure swing?
A: When price fails to make a new high or low – a lower high in an uptrend or higher low in a downtrend – signalling weakening momentum.
Q: Is a mitigation block the same as an order block?
A: No. An order block is the origin of an impulsive move (continuation); a mitigation block is a failed-swing reversal zone.
Q: Does a mitigation block need a liquidity sweep?
A: No – that’s the whole point. If liquidity is swept before the break, it’s a breaker block, not a mitigation block.
Q: What timeframe should I use?
A: Read structure and key areas on a higher timeframe (H1, H4, daily) and refine the block and entry on a lower one.
Q: Why do traders confuse mitigation and breaker blocks?
A: Because they look almost identical; the only reliable difference is whether liquidity was swept before the structure break.
Q: Is the term ‘mitigation block’ standardised?
A: No. It’s used inconsistently across SMC communities, so adopt the ICT-precise definition and apply it consistently.
Q: Do mitigation blocks work on Indian markets?
A: Yes. They read liquidity and structure behaviour and apply to any market, including forex and Indian currency derivatives.
Q: Do I still need risk management with mitigation blocks?
A: Absolutely. It’s a discretionary zone, not a guarantee – a stop-loss and sound position sizing remain essential.