
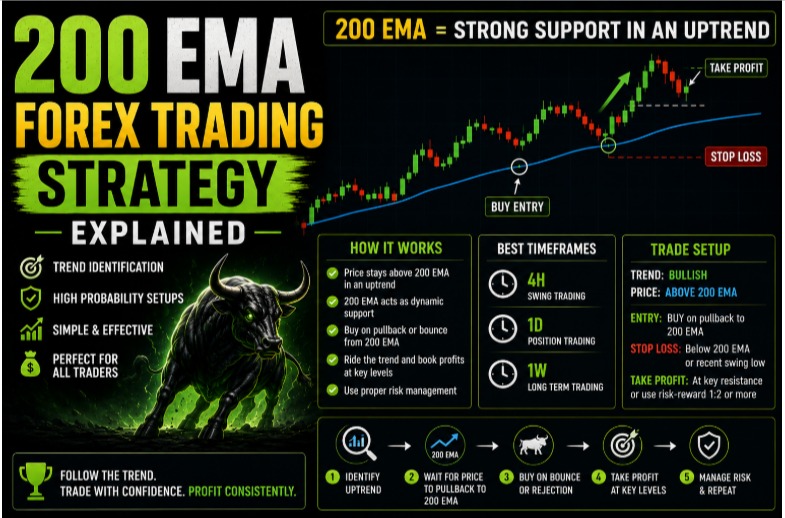
Introduction
The 200 EMA strategy is one of the most trusted and effective trading methods used by Forex traders across the world. Whether you are a beginner learning the basics or an experienced trader looking to improve consistency, the 200 Exponential Moving Average offers a simple yet powerful way to identify the overall market direction. Unlike indicators that produce frequent false signals, the 200 EMA filters short-term market noise and highlights the dominant trend, allowing traders to make better trading decisions. Many professional traders, hedge funds, and institutional investors use this moving average as part of their daily technical analysis, making it one of the most respected indicators in financial markets.
One of the biggest reasons traders lose money is because they constantly trade against the trend. The 200 EMA strategy helps eliminate this mistake by encouraging traders to follow the market instead of predicting reversals. When combined with trend following, understanding dynamic support resistance, proper swing trading techniques, and disciplined technical analysis, this strategy becomes a complete trading framework capable of producing high-quality trade setups over the long term.
What Is the 200 EMA Strategy?
The 200 EMA strategy is based on using the 200-period Exponential Moving Average as a trend filter. Unlike the Simple Moving Average, the Exponential Moving Average places greater emphasis on recent price movements while still reflecting the long-term direction of the market. This makes it more responsive to changing market conditions without becoming overly sensitive to minor price fluctuations.
The primary purpose of the 200 EMA strategy is to help traders determine whether buyers or sellers currently dominate the market. When price trades consistently above the 200 EMA, it generally indicates bullish market conditions. When price remains below the moving average, bearish momentum usually dominates. Rather than constantly guessing where price might reverse, traders focus on trading in the direction of the prevailing trend. This simple principle forms the foundation of successful trend following and allows traders to avoid unnecessary losses caused by emotional decision-making.
Because thousands of professional traders monitor the 200 EMA every day, it often becomes an area where price reacts repeatedly. This makes it valuable not only for identifying trends but also for understanding potential dynamic support resistance levels.
Why Professional Traders Use the 200 EMA
Professional traders rarely rely on dozens of indicators. Instead, they focus on tools that consistently provide useful information. The 200 EMA strategy has earned its reputation because it simplifies market analysis while improving trading discipline. Instead of taking random trades based on emotions, traders first determine the overall market direction before looking for opportunities.
One of the biggest advantages of the 200 EMA strategy is that it naturally encourages trend following. Financial markets spend a significant amount of time trending, and traders who learn to identify those trends often achieve greater consistency than those constantly attempting to predict reversals. By allowing the moving average to determine the market bias, traders remove much of the uncertainty from their decision-making process.
The 200 EMA also serves as a valuable reference during technical analysis because many institutions use it as part of their own trading systems. This widespread usage increases the likelihood that price will react around the moving average, making it an important area to watch during every trading session.
Understanding Trend Following
Successful trading does not require predicting every market movement. Instead, it requires identifying the direction in which the market is already moving and aligning trades with that momentum. This philosophy is known as trend following, and it is one of the core principles behind the 200 EMA strategy.
During strong bullish markets, professional traders focus primarily on buying opportunities because the overall momentum favors higher prices. During bearish markets, they concentrate on selling opportunities. This disciplined approach allows traders to avoid unnecessary counter-trend positions that often produce losses.
The beauty of trend following is its simplicity. Instead of fighting institutional momentum, traders learn to move alongside it. Over time, this creates more consistent results while reducing emotional stress. The 200 EMA strategy makes trend following much easier by providing a clear visual representation of the dominant market direction.
Dynamic Support Resistance Explained
Traditional support and resistance levels remain fixed at specific price areas. However, markets constantly evolve, and price rarely respects static levels forever. This is where dynamic support resistance becomes valuable.
The 200 EMA acts as dynamic support resistance because it continuously adjusts with price. During strong uptrends, price often retraces toward the moving average before finding buyers and continuing higher. During bearish trends, price frequently rallies back toward the 200 EMA before sellers regain control.
This repeated behavior is one of the reasons why the 200 EMA strategy remains effective across multiple financial markets. Instead of drawing numerous support and resistance lines, traders can use the moving average as a constantly updating reference point. Understanding dynamic support resistance allows traders to identify healthier entry opportunities while avoiding emotional trades based on short-term volatility.
Using the 200 EMA for Swing Trading
The 200 EMA strategy is particularly effective for swing trading because it helps traders capture larger market movements while filtering out smaller fluctuations. Unlike scalpers who aim for small profits within minutes, swing trading focuses on holding positions for several days or even weeks.
When using the 200 EMA strategy for swing trading, traders first determine whether price remains above or below the moving average. They then wait patiently for temporary pullbacks instead of chasing price after strong moves. Once the pullback reaches an important area near the moving average and price begins showing signs of continuation, traders look for potential entries aligned with the dominant trend.
This patient approach improves trade quality because entries occur after temporary corrections rather than emotional breakouts. Combining swing trading with disciplined trend following often results in better risk-to-reward opportunities.
Technical Analysis with the 200 EMA
Every successful trader relies on effective technical analysis to make informed decisions. The 200 EMA strategy forms an important part of this analytical process because it provides valuable context for interpreting market behavior.
Instead of using the moving average alone, experienced traders combine it with candlestick analysis, chart patterns, trendlines, and important price zones. If bullish candlestick patterns appear while price respects the 200 EMA during an uptrend, the probability of continuation often increases. Similarly, bearish rejection candles near the moving average during a downtrend strengthen bearish trading opportunities.
Good technical analysis is never based on a single indicator. Instead, it involves combining multiple forms of market confirmation. The 200 EMA strategy serves as the foundation upon which additional analysis can be built, making trading decisions more objective and consistent.
Common Mistakes Traders Make
Although the 200 EMA strategy is relatively simple, many traders fail to use it correctly. One common mistake is entering trades simply because price touches the moving average. The 200 EMA should never be treated as an automatic buy or sell signal. Instead, traders should wait for confirmation through price action and overall market conditions.
Another frequent mistake involves ignoring trend following by attempting to trade against the dominant trend. Counter-trend trades may occasionally succeed, but they generally carry significantly higher risk. Many traders also misunderstand dynamic support resistance, expecting price to reverse at the exact moving average rather than treating it as an area of potential reaction.
Some traders overcomplicate the strategy by adding numerous indicators that produce conflicting signals. The strength of the 200 EMA strategy lies in its simplicity. Clean charts combined with disciplined technical analysis often outperform overly complicated trading systems.
Risk Management
Even the most reliable trading strategy cannot eliminate losing trades. The 200 EMA strategy provides an edge, but success ultimately depends on disciplined risk management.
Professional traders never risk large portions of their trading capital on a single position. Instead, they maintain consistent position sizing while ensuring that every trade offers an attractive risk-to-reward ratio. This disciplined approach allows traders to remain profitable even when several trades result in losses.
Successful technical analysis becomes much more effective when combined with proper money management. Protecting trading capital ensures that traders can continue participating in future opportunities while avoiding emotionally driven decisions.
Best Timeframes for the 200 EMA Strategy

The flexibility of the 200 EMA strategy makes it suitable for almost every trading style. Although it works on lower timeframes, many traders find that higher timeframes provide cleaner signals with less market noise.
For swing trading, the four-hour and daily charts often provide the highest-quality opportunities because trends remain more stable. Day traders commonly use the one-hour chart, while long-term investors frequently monitor the daily and weekly charts.
Regardless of timeframe, the principles remain identical. The focus remains on trend following, identifying dynamic support resistance, applying disciplined technical analysis, and avoiding trades that conflict with the dominant market direction.
Conclusion
The 200 EMA strategy remains one of the most respected trading methods because it provides clarity, simplicity, and consistency. Instead of chasing every market movement, traders learn to identify the dominant trend and wait patiently for high-quality opportunities. By combining the 200 EMA strategy with effective trend following, understanding dynamic support resistance, applying disciplined technical analysis, and using patient swing trading techniques, traders can significantly improve both their confidence and long-term performance.
While no strategy guarantees profits, consistently following the principles of the 200 EMA strategy helps traders avoid many common mistakes that prevent long-term success. With regular practice, proper risk management, and continuous chart study, this strategy can become a reliable foundation for any Forex trading plan.
Frequently Asked Questions
What is the 200 EMA strategy?
The 200 EMA strategy is a trend-following trading method that uses the 200-period Exponential Moving Average to identify the overall market direction and help traders make higher-probability trading decisions.
Why is the 200 EMA important?
The 200 EMA is widely followed by professional traders and institutions because it clearly identifies long-term trends and frequently acts as dynamic support resistance.
Is the 200 EMA strategy suitable for beginners?
Yes. The 200 EMA strategy is beginner-friendly because it simplifies market analysis while teaching the importance of trend following, technical analysis, and disciplined risk management.
Can I use the 200 EMA strategy for swing trading?
Absolutely. The 200 EMA strategy is one of the most effective methods for swing trading because it helps traders identify long-term trends while avoiding unnecessary market noise.
Does the 200 EMA strategy work on all timeframes?
Yes. Although the strategy can be used on every timeframe, many traders prefer the four-hour and daily charts because they provide stronger trends and more reliable opportunities for technical analysis and trend following.